How to create a Custom Block in WooCommerce Checkout in 2024

Here’s how I created the first custom WooCommerce React Block of my life, without knowing WordPress blocks nor React. 🤯
In just 284 7 steps
- Why you might want to use WooCommerce Blocks
- Do I REALLY need React to add custom fields in WooCommerce Cart or Checkout?
- Prerequisites
- Configuring dev environment
- Frontend steps
- Building a Pickup date/time calendar using react‑datepicker
- Backend steps
Why you might want to use WooCommerce Blocks
WooCommerce recently replaced legacy Cart and Checkout shortcodes with Gutenberg blocks.
A better UX and DX
These blocks offer or will hopefully offer a better user experience with an « app » feeling (partial reload), and hopefully a better developper experience with the ability to customize the checkout page and cart page (and actually all WooCommerce related pages) with the power of blocks: ability to move, add, remove, and customize options of each blocks.
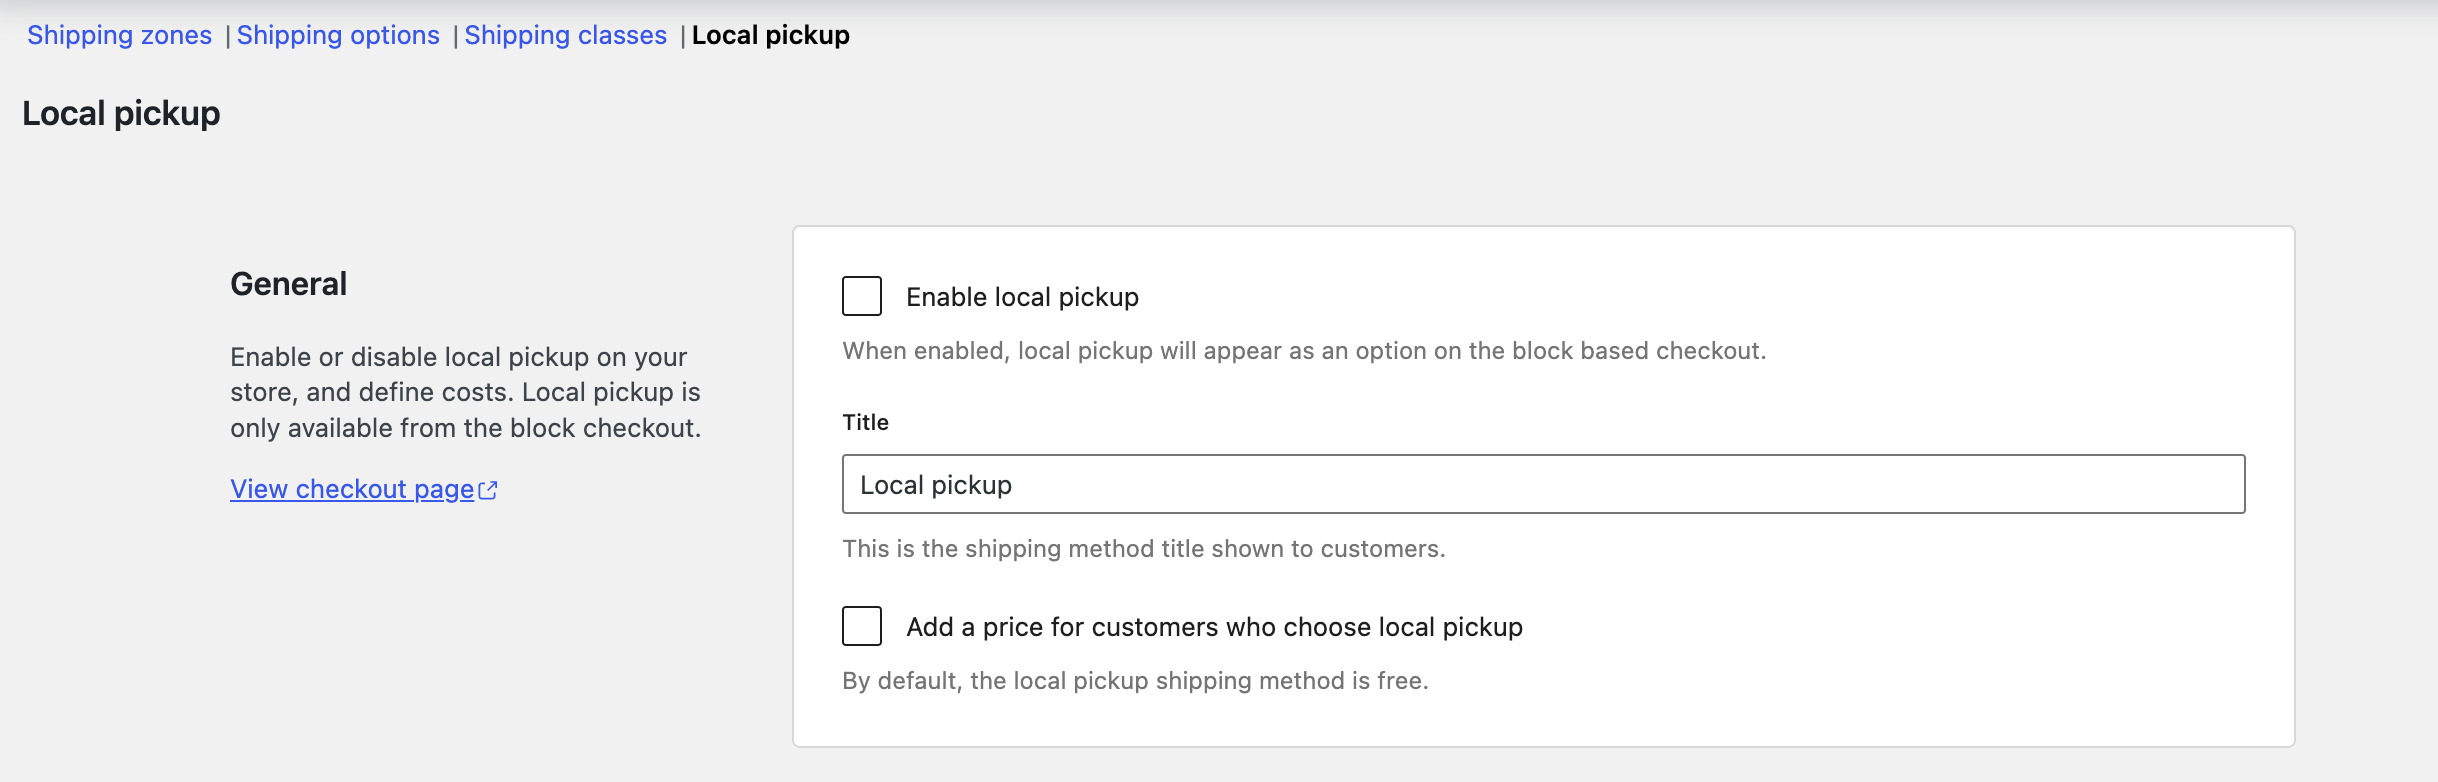
WooCommerce Local Pickup
WooCommerce Blocks also ship with a new nice feature: Local Pickup
Local Pickup in Blocks is a new enhanced delivery method that allows you to easily offer one or more pickup locations to your customers
WooCommerce Docs
This is a fully integrated solution to let shopper select from a list of local stores to collect their products.
You’ll need to replace legacy
[woocommerce_cart]and[woocommerce_checkout]shortcodes with the new Cart block and Checkout block. Follow the guide here.
Do I REALLY need React to add custom fields in WooCommerce Cart or Checkout?
No you don’t!
Bit by bit, Woo devs are adding new php hooks to customize the blocks default behavior. But at the time of writing this post, there are just a few experimental hooks to play with. Here is the list of available php hooks for WooCommerce blocks :
Unfortunately, this is something relatively new and the documentation isn’t easy to find.
Given your WooCommerce version, you may have to use the
__experimental_prefix.
Add Custom Fields in WooCommerce Checkout Block with your beloved PHP 🐘 only
The full documentation is here => Additional Checkout block fields in PHP, but in short, here are a few things to know:
As time of writing (April 2024), you can add only 3 types of fields: select, checkbox, and text.
And you can display your custom field in only 3 locations: Contact information, Addresses (Shipping and Billing), and Order information
Basically you’ll need to declare a hook like that:
add_action(
	'woocommerce_blocks_loaded',
	function() {
		woocommerce_register_additional_checkout_field(
			array(
				'id'       => 'namespace/marketing-opt-in',
				'label'    => 'Do you want to subscribe to our newsletter?',
				'location' => 'contact',
				'type'     => 'checkbox',
			)
		);
	}
);
If you use WooCommerce < 8.9, you’ll have to use the
__experimental_prefix, like this:__experimental_woocommerce_blocks_register_checkout_field( // ... );
This will give you a fully functionnal field:
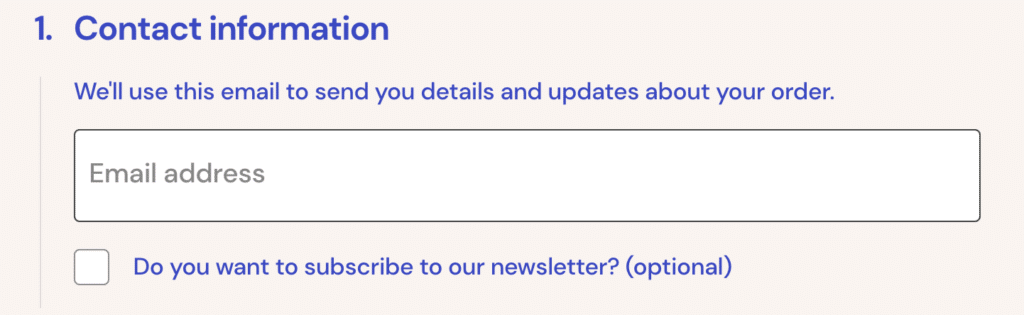
Sadly, the field types list is very limited for now. Here comes the need for a custom block...
Prerequisites
- Having a local install with WordPress and WooCommerce installed
- Having WooCommerce Checkout/Cart blocks activated
- Having access to a terminal
- Having NodeJS (preferably with NVM) and npm installed
- Knowing a bit of JS (if you already know React it will be easier, but not mandatory 😎)
Configuring dev environment
This is obviously the hardest part (if you’re not a seasoned front developper 💪)
From scratch
No, just kidding, let’s move to the next chapter.
Using the magic command 🪄
Fortunately there is a script which will install and configure all the dependencies for you automagically. Actually it installs all the frontend logic for a react custom field (it adds a newsletter subscription checkbox to the checkout). Note that you’ll need to add the backend part yourself, but it’s covered in this post later.
Let’s start by going into your favorite terminal and go to your wp-content/plugins folder:
cd /wp-content/plugins
From your plugins directory, run the following command:
npx @wordpress/create-block -t @woocommerce/extend-cart-checkout-block your_extension_name
Don’t forget to replace
your_extension_namewith your actual extension name.
Here’s what each part of the command does:
npx: NPX is a tool that comes with npm, used to execute packages. It’s particularly useful for running packages that aren’t globally installed.@wordpress/create-block: This is the package being executed. It’s a tool provided by the WordPress team for generating block plugins for the Gutenberg editor.-t @woocommerce/extend-cart-checkout-block: The-tflag stands for « template ». This part of the command specifies the template to be used for creating the block. In this case, it’s using a template provided by WooCommerce for extending the cart and checkout blocks.your_extension_name: This is the name you give to your block extension. Replace « your_extension_name » with the desired name for your extension.
When you run this command, it will generate the necessary files and structure for a WordPress block plugin using the WooCommerce template, with the name you specified for your extension.
You will find all the necessary information on the template repository.
At this point, you should be able to activate the plugin in WordPress and see something changed in your checkout and cart blocks.
The plugin’s files structure
This npx package creates a WordPress plugin, with among other things, the following files:
your-extension-name.php: The plugin’s main file with some useful boilerplate inside ityour-extension-name-blocks-integration.php, responsible for enqueuing the JS and CSS filespackage.json, responsible of the dependencies and the scripts you can run (we’ll talk about it in a minute)webpack.config.js(that’s the part you don’t want to deal with) with all the necessary webpack configuration.nvmrc, which will try to install and use the right nodejs version. It might fail. It it does, try to install AND use the nodejs version specified in this file (you can use nvm for that), then delete everything and try again.- An
srcfolder, which actually contains our block. Inside it you’ll find among other files:/js/checkout-newsletter-subscription-block/edit.js:
➞ This file handles the block’s logic in Gutenberg editor/js/checkout-newsletter-subscription-block/block.js
➞ This file handles the block’s logic in Frontend/js/checkout-newsletter-subscription-block/block.json
➞ Responsible for the gutenberg block config
The package.json looks like this:
{
	"name": "your-extension-name",
	"version": "0.1.0",
	"author": "The WordPress Contributors",
	"license": "GPL-2.0-or-later",
	"main": "build/index.js",
	"scripts": {
		"build": "wp-scripts build",
		"format": "wp-scripts format",
		"lint:css": "wp-scripts lint-style",
		"lint:js": "wp-scripts lint-js",
		"packages-update": "wp-scripts packages-update",
		"plugin-zip": "wp-scripts plugin-zip",
		"start": "wp-scripts start"
	},
	"devDependencies": {
		"@woocommerce/dependency-extraction-webpack-plugin": "^3.0.0",
		"@woocommerce/eslint-plugin": "^2.2.0",
		"@wordpress/prettier-config": "^3.13.0",
		"@wordpress/scripts": "^27.7.0"
	}
}
In this file you’ll find the dependencies in devDependencies, and the scripts:
The scripts
The package.json has some of the @wordpress/scripts preinstalled.
You’ll need these commands to work with WooCommerce blocks:
start
npm start
Transforms your code so it’s ready for development. The script will automatically rebuild if you make changes to the code, and you will see the build errors in the console. This is the command you run when you’re coding your block. Keep an eye on the terminal, it will display the build errors (which will happen).
build
npm run build
Transforms your code so it’s ready for production and optimized for the best performance. This is the command you launch before shipping your code to production (or during your deploy process, depending on the tools you’re using).
plugin-zip
npm run plugin-zip
Creates a zip file for a WordPress plugin.
This command might need an adjustment on this config. To have a working plugin zip with all the files I needed, I’ve had to add this in
package.json:"files": [ "*", "build/*", "src/*" ]
That’s it! Let’s build something cool. 🚀
The Frontend steps
Depending on what you’re trying to achieve, you might actually just have to search and replace things, since you already have a custom field.
But let’s dig a little deeper.
The Editor part (edit.js)
In the /src/js/checkout-newsletter-subscription-block/ directory, you’ll find an edit.js file. This file handles your field’s behavior inside the Editor, so when you edit the Checkout page with Gutenberg. You’ll find for example a place to set options for the block.
But I assume you just want to add a custom field in your checkout block, not learn how to let your users customize this field in admin.
So let’s skip this file and hop to the next one.
The Frontend part (block.js)
In the /src/js/checkout-newsletter-subscription-block/ directory, you’ll find an block.js file.
This is what you were looking for! Indeed, this file contains the block which will display on the frontend.
What are useState, useEffect, useSelect and useDispatch? That’s time for some React notions:
useState:
useState is a React hook used for managing state in functional components. It allows you to declare state variables and provides a way to update them. It returns a stateful value and a function to update it.
Example:
In our code, useState is used to manage the state of checked, which represents whether the checkbox is checked or not.
useEffect:
useEffect is a React hook that allows performing side effects in functional components.
It is used to handle side effects like data fetching, DOM manipulation, or subscribing to external services.
It runs after every render by default (including the initial render), but you can specify dependencies to control when it runs.
Example:
In our plugin, the useEffect hook is responsible for two main tasks:
- Sending data to the server using
setExtensionData. - Handling validation errors:
- If the checkbox is not checked (
!checked), it sets a validation error message and makes it visible. - If the checkbox is checked, it clears any existing validation errors for this extension.
- If the checkbox is not checked (
useSelect and useDispatch:
useSelect and useDispatch are typically used in conjunction with Redux, a state management library for JavaScript applications.
useSelect is a hook provided by the @wordpress/data package that allows selecting data from the Redux store.
In our case, it selects the validation error for the extension.
useDispatch is also provided by @wordpress/data and is used to dispatch actions to the Redux store.
Here, it’s used to set and clear validation errors.
Let’s build a Pickup date/time calendar using react‑datepicker
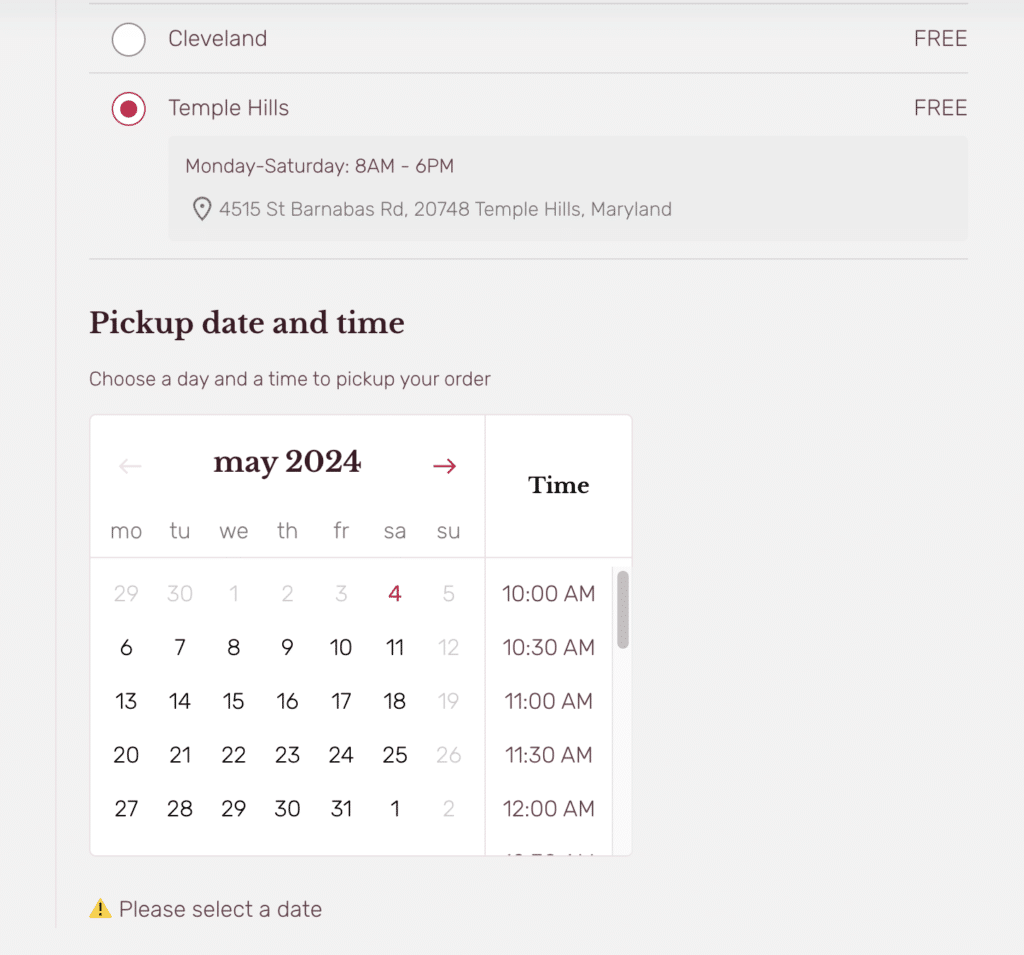
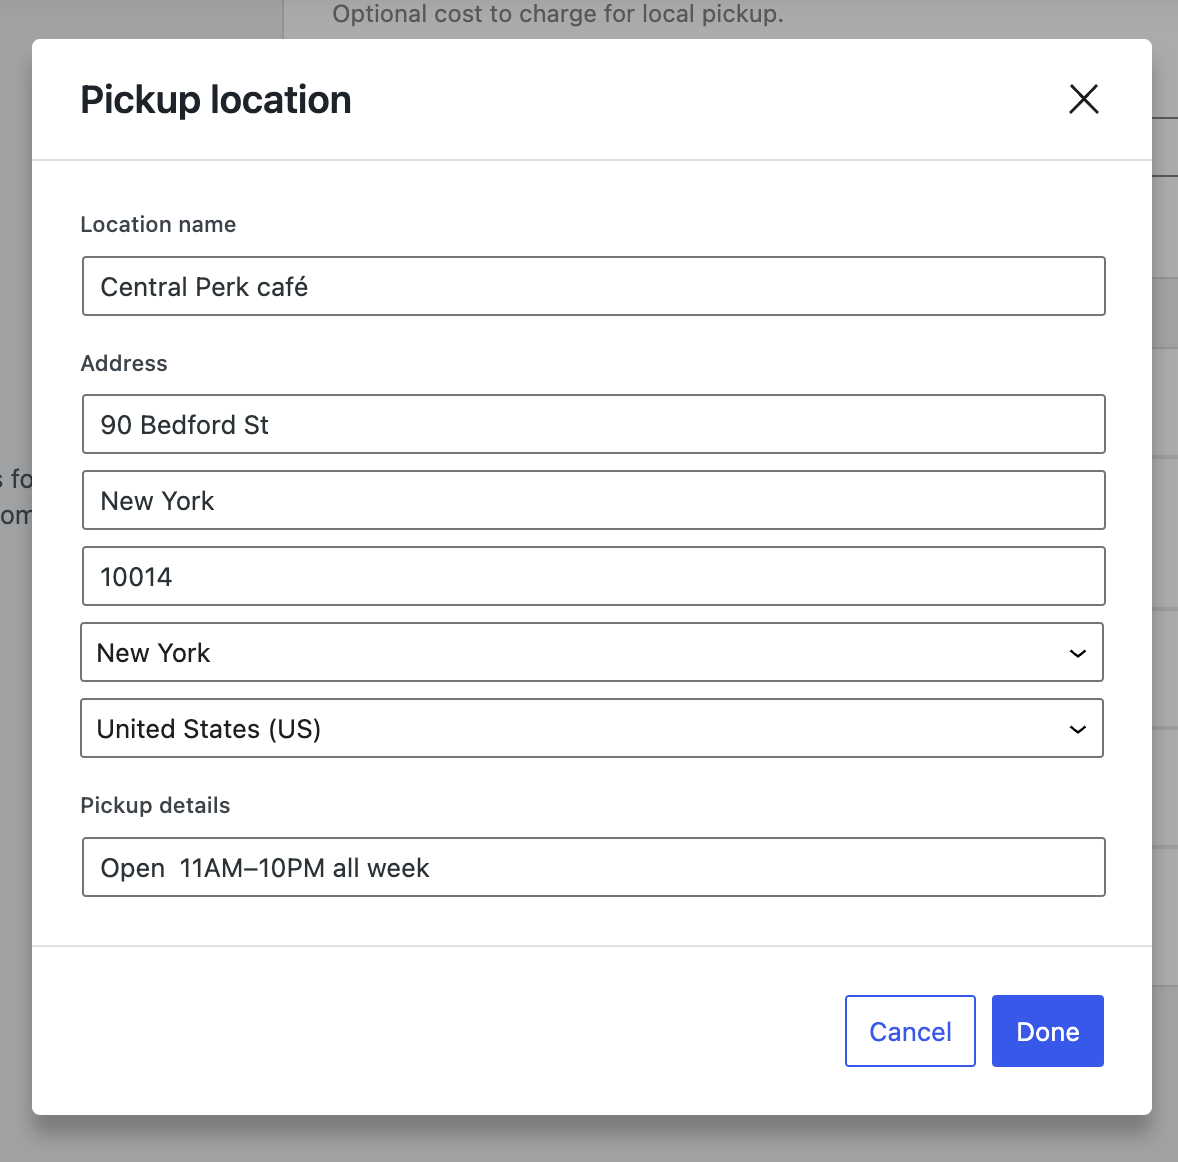
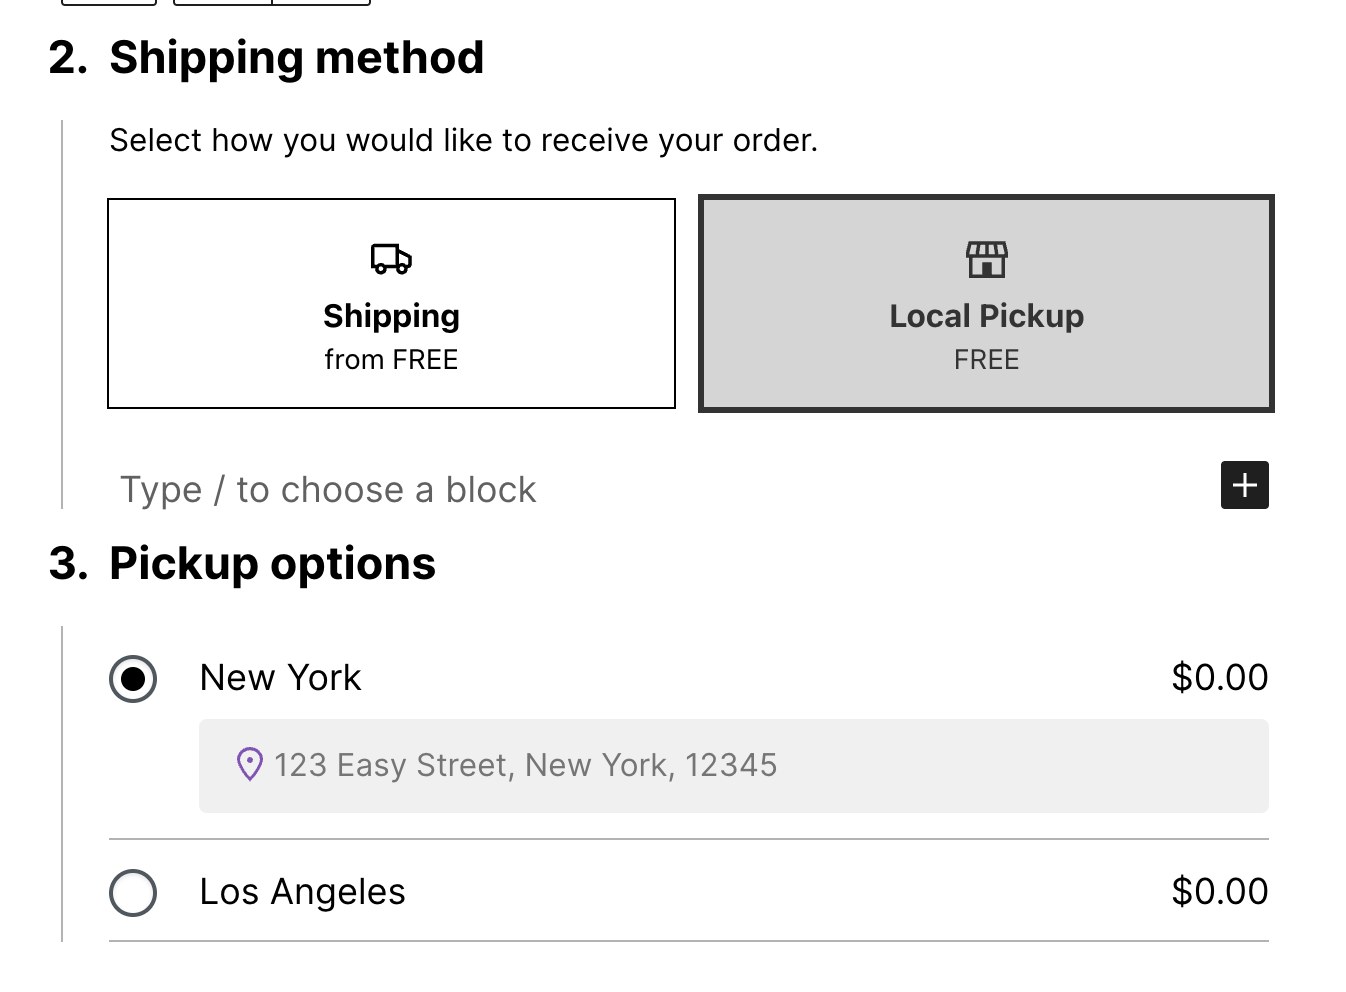
After configuring our Local Pickup entries, we’ll need a way to let shoppers choose a date and a time, because we’re selling fresh products and we need to know when the clients will come.
As of April 2024, that’s not achievable with php only, because it’s only possible to use a text, select or checkbox input.
Installing and importing the dependencies
First let’s install react-datepicker. We’ll also need date-fns to work with dates:
Then, we need to import the dependencies on the top of our block.js file:
Handling the Datepicker state
The calendar state will be stored in the startDate variable, using the useState React hook. This let you also implement the setStartDate method, responsible to set the startDate state. Here we pass to the useState function the default value, which will be the date of tomorrow, at 10AM.
The Datepicker component
Here you can see how the state is handled by our component: the startDate stores our date, and on datepicker change, we update the state with setStartDate.
Handling the Datepicker side effects
Inside the useEffect React hook, we’ll take care of sending the data to the server: using setExtensionData method, we’re telling react to send to backend a pickup_date object containing our startDate.
If you look closer, you’ll see that the startDate is also present in the dependency array at the end of the useEffect hook. Whenever any of these dependencies change, the effect function provided to useEffect will be re-executed.
Thanks to that, we are also able to throw an error if startDate is missing.
Communicate with other fields using the cart prop
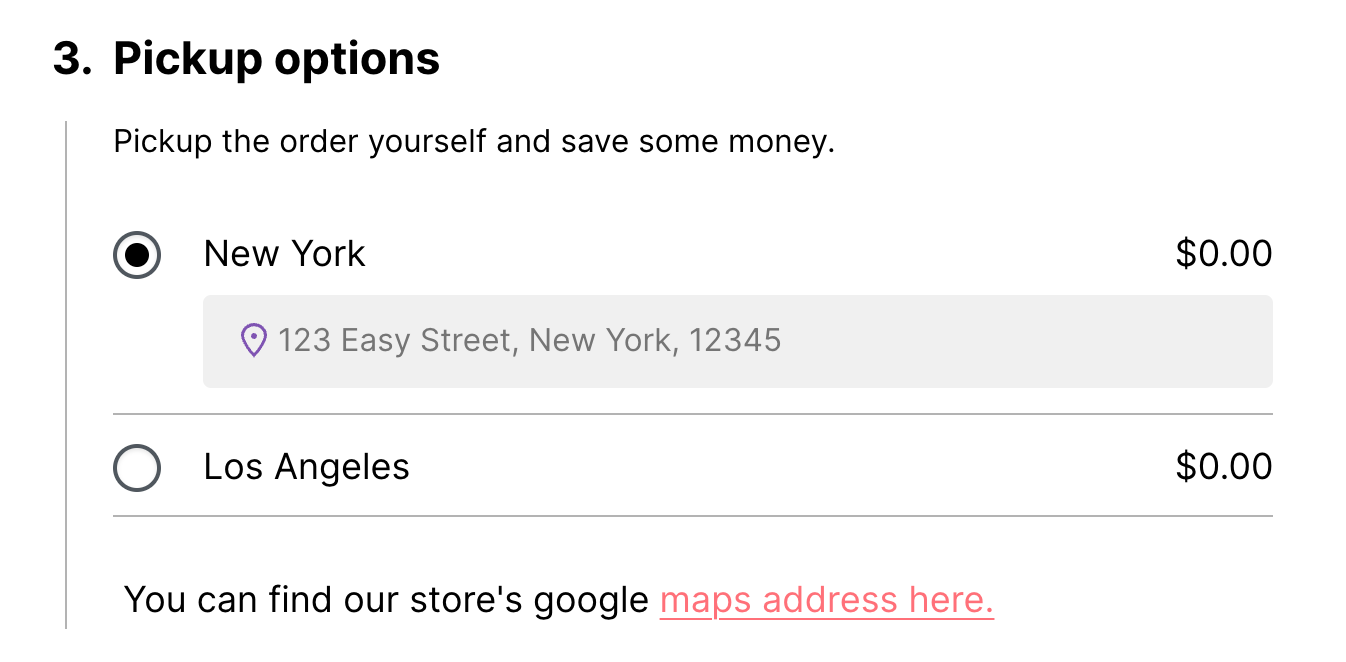
What if the different stores inside Local Pickup component above have different opening hours? It would be great to ensure the selected date/time is compatible with the selected shop opening hours.
Our component automatically receive a cart prop containing all the data necessary to checkout, like shipping and billing instructions, payment methods, etc. This prop is also updated in realtime with all the data filled by user in the checkout form fields.
First we need to pass this cart prop to our component, like that:
and declare a selectedShippingRate variable, which calls a getSelectedShippingRate function, like this:
We also need to add the selectedShippingRate to useEffect dependency array, like that:
This way, when the client will select another pickup location, our component will be re-rendered
Now we need to get the stores opening hours. Here we’ll just use a harcoded object but in real life you would use the get_script_data() method of the IntegrationInterface.
This method is already available inside your-extension-name-blocks-integration.php
In order to keep this tutorial easy to follow, we’ll just use a plain js object containing our opening hours:
And we’ll add two methods to check if the selected pickup location is open on giving date/time:
The cool thing with React state is you can add dynamic parts anywhere on your page just by adding a {prop} in a tag. Here, two things happen:
- The Calendar rerenders when you select another pickup location. If the store is closed on Sunday, the Datepicker will disable all sundays.
- When you select a date and a time, the paragraph below the Datepicker will update with the selected date and time.
The Backend steps
The backend steps like storing the data, and then get it, are not shipped with the npx command. Unfortunately.
But here is the good news: we’re back with PHP 🐘 ! No more JS! No more build steps! Hoorray.
Extending the WooCommerce Store endpoint
We already sent the data to the backend using setExtensionData, meaning we can now access it in php, but nothing has been performed in the database. Yet.
But first we need to add our field to the Store endpoint, meaning defining the structure and behavior of the « Pickup Date » field within the checkout process.
In simpler terms, it’s like telling the system:
« Hey, when you’re building the checkout page for WooCommerce, make sure to include a field called ‘Pickup Date’. Here’s how it should look, what type of data it should accept, and any additional rules or validations it needs to follow. »
We’ll create a new file named your-extension-name-extend-store-endpoint.php
This file extends the Store API for WooCommerce blocks by adding our field schema to the checkout endpoint.
We also need to require it into the plugin’s main file (your-extension-name.php), and call the init() method.
Storing and getting the data
Finally, we will actually store the field value in the database.
Let’s create a new file:
This class will be responsible for storing the data, and also displaying the data in admin order, order confirmation page, and order confirmation email.
The fields data will be stored inside order
postmeta.
This will allow you to get these data by simply calling$order->get_meta().
The last step is to require and call this class inside our plugin’s main file:
And… you’re done.
Conclusion
Even if this could seem overkill for « just » adding a custom field (it is), it actually offers a lot of options and lets you customize deeply the checkout process.
Personally, it was greatly beneficial for me as I learned a lot through this epic journey. I even made a blog post about it, and you read it entirely.
Happy coding!
Hello, good evening! Your article is very interesting. Thank you very much, I wanted to ask you a question. I placed that code and the checkbox appeared perfectly in the checkout: add_action( ‘woocommerce_blocks_loaded’, function() { woocommerce_register_additional_checkout_field( array( ‘id’ => ‘namespace/marketing-opt-in’, ‘label’ => ‘Do you want to subscribe to our newsletter?’, ‘location’ => ‘contact’, ‘type’ => ‘checkbox’, ) ); } ); Now I wanted to ask! How do I get the value of the checkbox as metadata? I understand that I need to place some code here, but I don’t know how to access the checkbox value. Could you help me? Thank you very… Lire la suite »
Hi,
It seems you use the php way, so you don’t need to store the data yourself, it is already handled by WooCommerce. You should be able to get this data anywhere with
get_metadatahttps://github.com/woocommerce/woocommerce/blob/trunk/plugins/woocommerce-blocks/docs/third-party-developers/extensibility/checkout-block/additional-checkout-fields.md
Hi, I am relatively new to woocommerce blocks. I followed the steps but i was not able to replicate the date time picker block. Could you please share the gitbub or any other way i can access the date picker code? That would be really helpful for me!! Thank you so much in advanced.
Hi, sorry I can’t share the real github because it has all the client logic, but all the code should be in this post…
Which step is blocking you? Do you have any error message?